The Secure Shell Protocol (SSH) is a cryptographic network protocol for operating network services securely over an unsecured network. Its most notable applications are remote login and command-line execution.
SSH is typically used to access a remote computer/server and execute commands, but it also supports tunneling, forwarding TCP ports and X11 connections also it can transfer files using the associated SSH file transfer (SFTP) or secure copy (SCP) protocols. SSH uses the client–server model. Today we will discuss how can we configure an SSH server and connect to it.
Post Contents
Installing SSH server
There are dozens of SSH server/clients available however OpenSSH is used for almost every use cases as it provides all of the necessary components for remote access, key management, and server side tools (ssh-agent, sshd). It’s a cli program and mostly used by Unix and Unix like systems but available for every operating systems including Windows.
In most of the Linux systems openssh comes preinstalled. So it should work out of the box but if you wish to install it, use this command (for ubuntu)
sudo apt install openssh-serverOpenssh server should be installed right away.
Connecting to the SSH Server
Now that ssh server (openssh) is setup and ready to connect. We need another device within the same network to test if we can connect with our ssh server.
SSH protocol offers classic username and password authentication as well as key based authentication. We’ll use both in this case, one by one.
Let’s start with basic authentication method. In this step, you need to know the username and password of the user of your ssh server (which you already know)
Open up a terminal on another device and run the commands
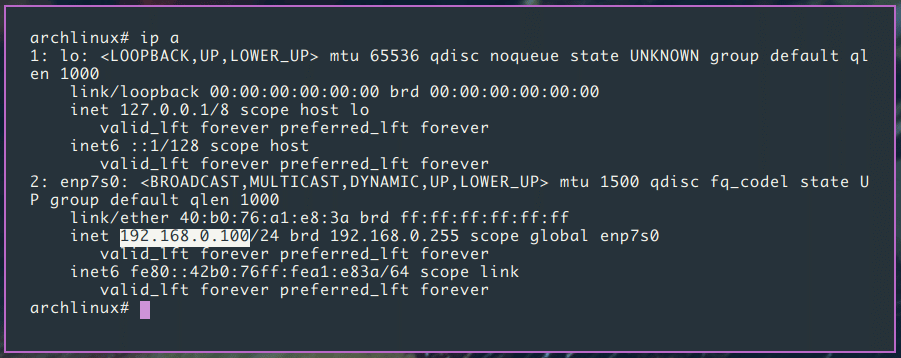
ssh username@ip_addressdon’t forget to replace username and ip address from your ssh server. If you’re not sure about your ssh server ip address then run this command to check the external ip address of your server.
ip aYou should see an output like this, as you can see my ip address is 192.168.0.100

While connecting to your ssh server for the first time you’ll see something like this:
The authenticity of host '192.168.0.100' can't be established.
ECDSA key fingerprint is SHA256:Vybt22mVXuNuB5unE++yowF7lgA/9/2bLSiO3qmYWBY.
Are you sure you want to continue connecting (yes/no)?
you should type yes. Then it’ll ask you to enter the password for the user.
Warning: Permanently added '192.168.0.100' (ECDSA) to the list of known hosts.
[email protected]'s password:
After entering the password you will see default welcome message from Ubuntu like this:
Welcome to Ubuntu 20.04 LTS (GNU/Linux 5.4.0-26-generic x86_64)

 * Documentation:  https://help.ubuntu.com
 * Management:     https://landscape.canonical.com
 * Support:        https://ubuntu.com/advantage
Now you can run any commands that will execute on your ssh server.
Connecting to SSH server using Key based authentication
Key-based authentication allows us to connect to our Linux server without entering a password. It’s recommend to use key based authentication. We need to generate the key pair consists of private key and public key and then append public key to the remote hosts ~/.ssh/authorized_keys file.
Step 1: Generating SSH key pair
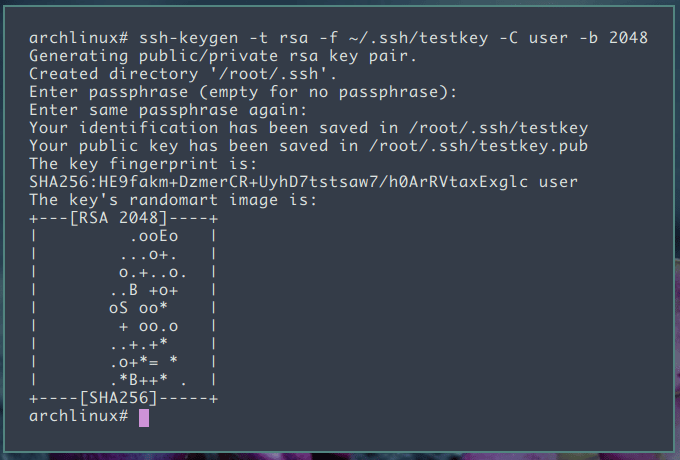
The following command will generate a new 2048 bits SSH key pair with your username. Replace KEY_FILENAME and USERNAME.
ssh-keygen -t rsa -f ~/.ssh/KEY_FILENAME -C USERNAME -b 2048Now the ssh-keygen prompt will ask you to type a secure passphrase. You can type a passphrase or if you don’t want to use a passphrase just press Enter.
Note: It’s really up to you whether you want to use passphrase or not. Of-course passphrase will add an extra layer of security. However, in most cases, system administrators use SSH without a passphrase because they are useful for fully automated processes.
The entire process will look like this:

Step 2: Append the public key to remote host
Openssh provides a tool called ssh-copy-id which will automatically append the public key to the remote host.
ssh-copy-id -i ~/.ssh/KEY_FILENAME.pub remote_username@server_ip_addressIt’ll ask for password of the remote host’s user. Once authenticated, the public key will be append to the remote hosts ~/.ssh/authorized_keys file and connection will be closed.
There is also another way to do so, if for some reason ssh-copy-id is unavailable or not works.
cat ~/.ssh/KEY_FILENAME.pub | ssh remote_username@server_ip_address "mkdir -p ~/.ssh && chmod 700 ~/.ssh && cat >> ~/.ssh/authorized_keys && chmod 600 ~/.ssh/authorized_keys"Step 3: Login to your server using SSH keys
Now we can login to our remote host without being asked for entering a password.
ssh -i ~/.ssh/KEY_FILENAME.pub remote_username@server_ip_addressIf everything went well, you’ll be logged in.
Disabling password based authentication
We can easily disable password based authentication. To do so, access to the remote host using ssh with root privileges and the edit the /etc/ssh/sshd_config file, as following:
PasswordAuthentication no
ChallengeResponseAuthentication no
UsePAM no
Now, save the file and restart the SSH service using following command:
sudo systemctl restart sshConclusion
In this guide we’ve learned about SSH, SSH clients/servers, password based auth, SSH key generation, key based auth and then disabling password based auth for extra layer of security. Hope this guide helps you to know everything about SSH protocol.
If you have any questions or feedback, feel free to leave a comment.